CLG Advanced Photography Course
Welcome to the course
Welcome to the Advanced Photography Course.
I’m thrilled that you've decided to join us and you’re in exactly the right place if you're ready to take your photography to the next level!
Our next course begins soon. The FB Group link will be added the week prior and you'll receive an email invitation to join.
How Does The Course Work?
The course contains 5 lessons with several modules within each. Lessons are released fortnightly (every 2 weeks) via your email inbox & here in our member's website. You will have a full 2 weeks to read, take in, practice the key components of each lesson and submit your challenge photos.
- Image Feedback
Our Private Facebook Group is where you'll share images from the lesson challenges, receive feedback and critique from instructors and other students, and ask questions. For each challenge submit 1-2 images inside the FB Albums. Once you've received your critique, you are welcome to re-submit another 1-2 images at a time to get feedback (avoid mass uploads of images because this will limit the depth of critique our instructors can provide to you) but you can re-submit images as many times as you need having implemented the feedback received. - FB Group Wall Sharing
The fb group wall is a great place to ask questions, share wins/frustrations, or share pull-backs. For your critique/challenge images please place only in the albums, so they're not missed by instructors. - Learning to Critique
Critiquing the work of others is very useful in helping photographers learn to “see”. In the first lesson you’ll learn how to constructively critique and you’ll be encouraged to do so on the work of your fellow students.
- Live Q&As
I will be online for our live Q&A Sessions every 2 weeks. You'll receive the dates and times of these sessions via email, and they'll be added as an event inside the Fb Group. You can go back and watch these in the Fb Videos Tab at anytime.
Before The Course Begins
- Review Your Camera
Before we kick off why not take a moment to become more familiar with your camera and all those bits and bobs on the back of your screen. Click through to the prep task to find a handy guide on camera functions. The model I’ve used is a Canon 7D, you just might need to refer to your specific user guide to find where the functions are located and which dial/button/switch controls each of the functions mentioned. -
A Word on Editing Programs
The two editing programs that I demonstrate/use in this course are Adobe Lightroom and Photoshop Elements. Personally I recommend Lightroom Classic as a first choice, and you only need one of the two. These are excellent, affordable, professional editing software systems that allow you to process your images. In Lesson Four we spend time looking at how to use these programs from the very beginning, and then how to achieve clean, consistent, professional edits on your images.
By no means do you have to buy this software, but if you'd like to prepare for the editing lesson then these are what we'll be using. Alternatively you can watch and decide if editing is for you, and come back to those lessons whenever it suits you! (Lightroom has a free trial period, so you could use that during the lesson and see how you go.) -
Lightroom Course Access: You can familiarise yourself with Lightroom right away, with Lightroom Introduction.
Prep Task #1 - Pinning for Inspiration
Pinning For Inspiration
Something that we're going to focus on in this course is creating a vision, and taking the steps we need to bring those images to life. One step in this process is learning how to critique and breaking down images we love, so that we can determine how a certain photograph was achieved, what elements contributed to it's success, and how we can go about implementing those elements or techniques in our own work!
It's a wonderful process to really have a look at the styles of photography or artwork that inspire us personally, and that way you can focus your efforts of the course with a specific goal in mind about the sorts of images you'd like to be creating.
Set Inspiration Goals
I'd like you to collect, just for yourself, a series of 15 - 50 images that you LOVE! Pinterest is a fantastic way to do that, because it means you're still ensuring the links are live to the original photographers website and it allows you to simply assemble images in a place with easy access! Look for images that call to you, which make your heart sing, and which inspire you!
This is just for YOU... but, I want it to be something you can come back to and refer to as we progress through the course!
In any study of art we look to the classics and the examples of those that have led before us, and this isn't about replicating style, or copying another persons work.. but it's about determining what you love and what you're drawn to artistically, and then learning the techniques so that you can go ahead and develop your own personal style!
When I was learning photography, I would find images and then reverse engineer the process to try and analyse how it had been achieved, and then try and practice it myself!
Have fun, and if you haven't used Pinterest before, we may not see you again for a couple of weeks! (it can be a little addictive)
Activity: Create Your Vision Board on Pinterest
Prep Task #2 - Review Your Camera
I'd love for you to take the time between now and when we get started, to review and/or refresh yourself with your camera, so that you're familiar with all the dials and settings that can help you to feel more comfortable and in control when you're shooting in manual mode.
We'll be digging deeper into many of the elements in the course, but it's great to have a general idea of some of the terminology and options available to you.
Simply have a play with your camera, looking over the menu setting options listed in the review guide or you may like to google your particular model. Take note that your camera might present information differently the example listed here, but if you get stuck on any of the options, you're welcome to come and ask in the group.
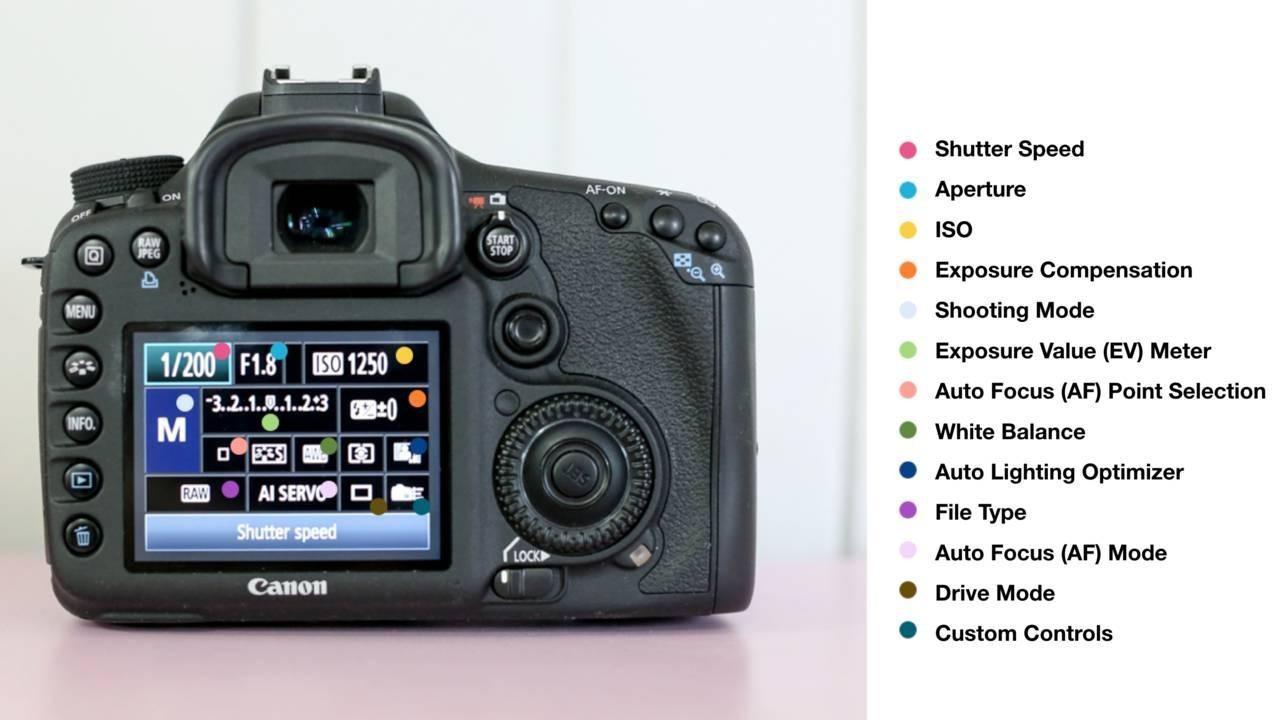
Familiarise/Refresh Yourself With Your Camera
Shutter Speed - The shutter speed setting
Aperture - The aperture setting
ISO - The ISO setting (Guide: Shooting at High ISOs for Best Results)
Shooting mode - The Mode you've selected to shoot in. Eg. : M – Manual, A – Auto, TV – Shutter Speed Priority, AV – Aperture Priority etc (Handy Article: Shooting Modes)
Exposure Value (EV) Meter - This meter is an indication of the exposure the camera is reading in any given situation. When the needle is at 0 it is indicating exposure is perfect. When the needle moves + of 0 (0 to +2 and beyond) it’s indicating possible over exposure. When the needle moves - of 0 (0 to -2 and beyond) it’s indicating possible under exposure.
On Canon the dial moves left (-) to right (+). On Nikon it moves right to left, but you can switch this in the custom menu options.
The meter is a handy guide, however it is important to note the camera can be tricked by the presence of mostly light or mostly dark tones in a scene and therefore an EV meter that is sitting at 0 doesn’t necessarily mean perfect exposure.
Metering Modes - This mode determines which part of the image the EV Meter will read the light from. There are three metering modes:
- Evaluative (Canon) or Matrix (Nikon) – Divides the area into zones and takes an average calculation, whilst simultaneously acknowledging the area you focussed on as the most important zone when determining its calculation.
- Centre Weighted – Uses only the centre of the frame and it’s near surrounding areas to calculate and unlike Evaluative/Matrix, it does not consider your focus point.
- Spot – Calculates based on a small area surrounding your focus point.
- Partial (Canon only) – Similar to spot metering only it covers slightly more than double the area surrounding the focus point.
We will be covering metering thoroughly in Lesson One!
Exposure Compensation - When shooting in TV, AV or P modes, if you’re unhappy with the exposure your camera has chosen, you can tell it to underexpose or overexpose by adjusting the exposure compensation meter. If you want to underexpose, adjust so the needle moves +/- from the 0 in the centre. When shooting in manual mode, this setting isn't necessary.
Auto Focus Point Selection - Which AF point has been selected. Different cameras have a range of options for selecting AF points, including touch screen options to touch on the area you want to focus on. Familiarise yourself with the AF options for your camera, so that you can use either the centre point, or toggle to use points to the side. Your camera may or may not use a grid display. (Handy Article: Focus Accurately)
White Balance - The White Balance Setting selected. Options include: Auto, Daylight, Shade, Tungstan, Cloudy, Flash etc. When shooting in RAW this is not as important. (Handy Article: White Balance)
Auto Lighting Optimizer/ Adaptive-D Lighting - Options are: Disable, Low, Medium, High. This allows the camera to bring out detail in shadow areas. Only relevant to Jpeg files, and I have never used this function.
File Type - Indicates if your camera is set to shoot in RAW, JPG or both. (Handy Article Explanation)
Auto Focus Mode - Determines how the camera achieves focus when in Auto Focus mode. The three options are: (Handy Article: Focus Modes)
- One Shot/ AF-S – locks focus when you half depress the shutter.
- AI Focus (not available on Nikon) – continuously tracks focus and only locks when the focus area stops moving.
- AI Servo/ AF-C on Nikon – Continuously tracks focus on whatever passes through the chosen focus point and never locks, when using continuous/burst mode. Designed for objects moving towards the camera.
Drive Mode - Drive mode setting selection. Options include:
- Single shot – takes one shot when the shutter button is pressed.
- Continuous shooting – takes multiple shots at a slow speed for as long as the shutter button is being pressed.
- High Continuous/Burst Mode – takes multiple shots at a high speed for as long as the shutter button is being pressed.
- Self timer – self explanatory!
Custom Controls - Allows you to customise which button/dial controls the varied functions according to your personal shooting style.
